Client Server Installation
Before you can use Conductor4SQL on a client instance, you need to install that client inside of Conductor4SQL.
Initial Setup
Before you start installing clients on Conductor4SQL, one needs to decide whether Conductor4SQL needs to use a SQL Server login or a Windows login to communicate with clients.
To adjust these settings, select Administration >> C4SQL Configuration >> Edit Default Client Service Credentials.
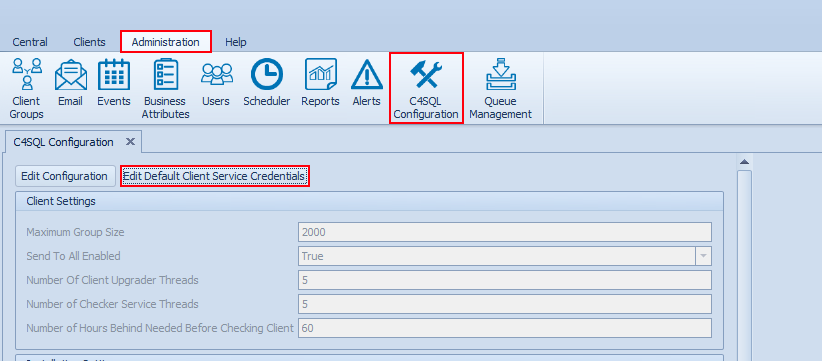
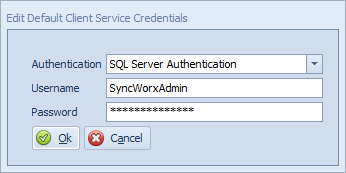
Edit the credentials on the screen below and click on the Ok button when complete.
Note
You can install a number of clients and then change the default, however, this will only affect clients that are installed after the change. Previously installed clients will still use the original credentials that they were installed with.
Note
By default, the login created at the client has a sysadmin role but these privileges can be lowered if needed.
Warning
If you use Windows Authentication for the client installations, there is a caveat in that the windows user that you log in as needs SQL Server access for any client that you are connecting to via the Client Console
Installing the Client (one-at-a-time)
Using this option you can install clients one-at-a-time
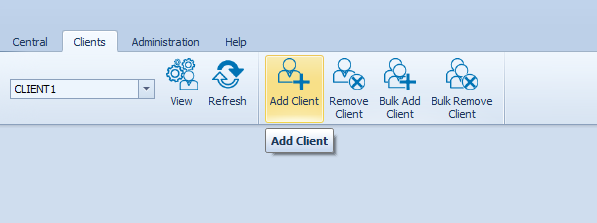
You can add a client by selecting Clients >> Add Client
Next fill in all the information for the Install Client dialogue box:
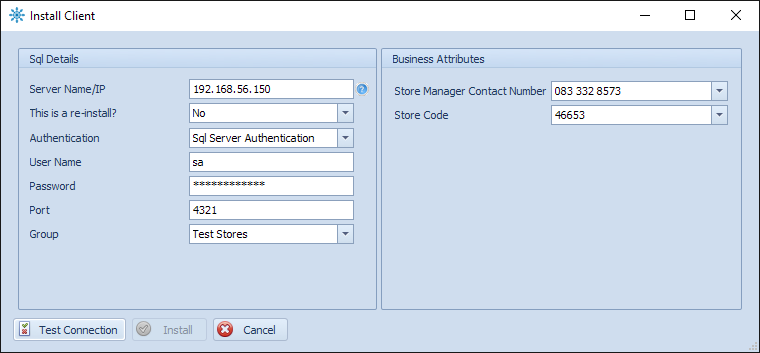
- Server Name/IP - The DNS name or IP address for the Client Server
- This is a re-install? - If the client was previously installed you will get a drop-down list showing the previous installation(s) for this client
- Authentication - is SQL Server authentication where your options are "Windows Authentication" or "SQL Server Authentication"
- If you are using "SQL Server Authentication" fill in the User name and Password fields.
- Port - The TCP port in which central will connect to the client.
- Group - the client group to which to add the Client Server (these are defined in the Administration section).
- Business Attributes - Custom fields for the client that are defined in the Administration Section.
Finally, select the Text Connection button
If the test is successful the Install button will be enabled. Click the Install button to continue.
The Client Server Pre-Checker

- A green circle indicates a favorable result.
- An amber circle indicates a warning.
- A blue circle indicates that a step could not be run due to error in a previous step.
- A red circle indicates that the Pre-Checker discovered an issue and will not proceed.
- A gray circle indicates that this step hasn't run yet.
- A orange arrow indicates that this step is currently running.
Pre-Checker Issues
- Step 1: Ensure that client server isn't already installed - Check that client server isn't already in the list of installed clients.
- Step 2: Ensure that we can ping the client server - If this fails run a manual ping. If this also fails contact your network administrator. Note if ping is disabled for your servers you'll need to disable this check. You can do this by disabling the Prechecker Ping Check under C4SQL Configuration
- Step 3: Ensure that we can access MS SQL server - If this fails run SQL Server Management Studio and check if you can connect to the server manually. If you cannot connect via SSMS check SQL Server TCP settings and firewall settings
- Step 4: Ensure that mixed mode authentication is enabled - If this fails switch the server to use Mixed-Mode authentication and restart the server. This is only relevant if SQL Server Authentication (the default) has been configured for Conductor4SQL.
- Step 5: Ensure that SQL version is MS SQL 2005 sp3 or higher is installed - If this fails you will need to upgrade your server to minimum requirements as per the central requirements document.
- Step 6: Ensure that the current SQL user is in the sysadmin user group - You require a user with sys-admin rights to install Conductor4SQL
- Step 7: Ensure that service broker is enabled - Service broker must be enabled on the msdb database in SQL Server in order for Conductor4SQL to operate. See How to enable Service Broker in the troubleshooting section below.
- Step 8: Ensure that Conductor4SQL database does not exist - We run this step to ensure that Conductor4SQL isn't already installed on this server. If this was a past uninstall (e.g. uninstalled instance from central only because the instance was offline). Then you will need to uninstall from client side only
- Step 9: Ensure that Conductor4SQL login does not exist - Same as above.
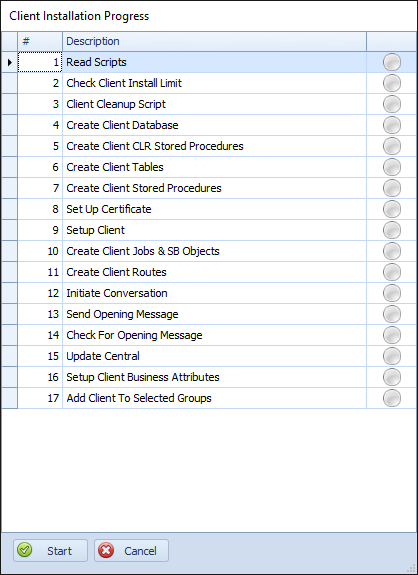
Client Installation Progress
After all steps in the pre-checker are successful we are ready to install Conductor4SQL onto the client server.
To start the installation process click on the Start button.
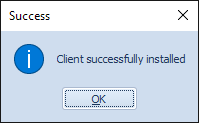
If the install is successful you should get a Client successfully installed notification.
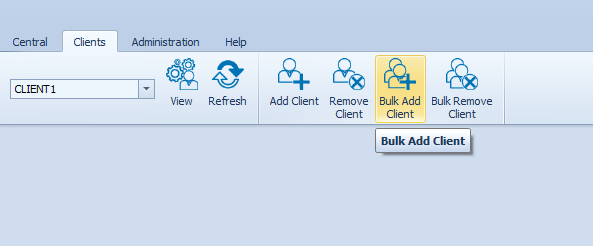
Installing the Client (using the bulk installer)
Using this option you can install a very large number of clients at once.
You can add the clients by selecting File >> Bulk Add Client
Next fill in the list of clients in the Bulk Client Installer screen
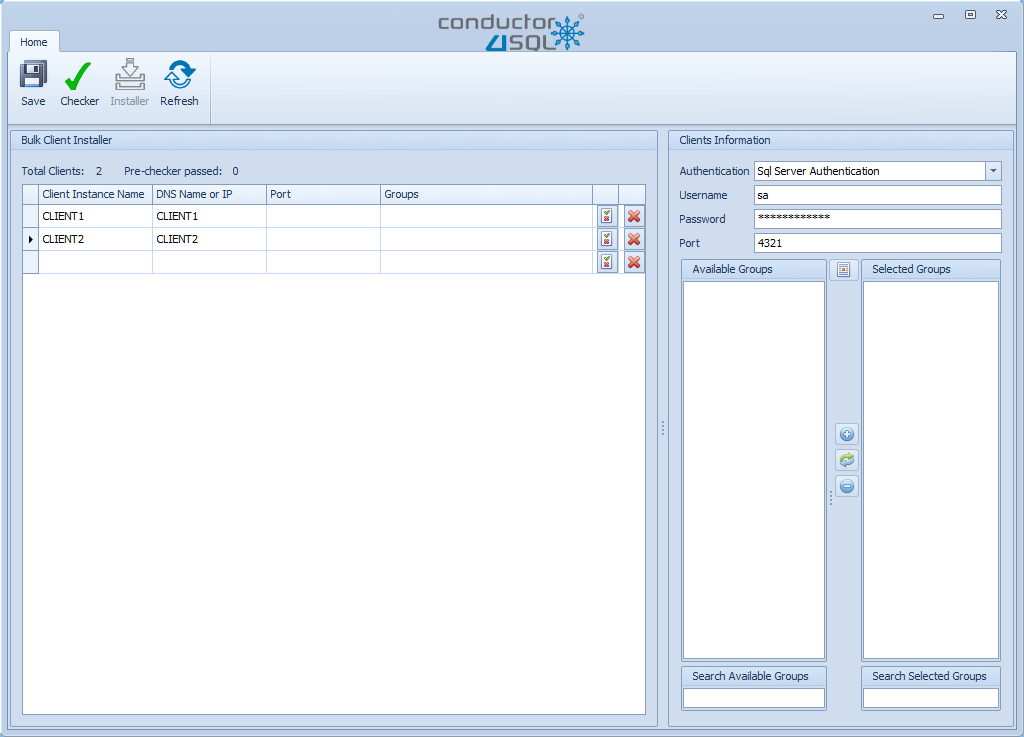
Bulk Client Capture columns:
- Client Instance Name - this column needs to be the name of the SQL Server
- DNS Name or IP - this column is the DNS Name or IP address of the server
- Port - the port used for central to communicate with the client (default is 4321)
- Groups - A comma separated list of groups that you would like to assign the client to.
- Business Attributes - All defined business attributes are situated between the port and groups columns.
Note
this grid acts like a spreadsheet grid and it is in fact recommended that you copy/paste the client information from a spreadsheet.
Clients' Information options:
- Authentication - the SQL Server authentication method used where the options are "Windows Authentication" and "SQL Server Authentication"
- Username and Password fields are only visible if you select "SQL Server Authentication"
- Port - the port to use for central to communicate with the clients if no port is defined in the client grid.
- Groups - select what groups to assign all bulk install clients to.
Click on the Save button to save your list of clients to install at a later date.
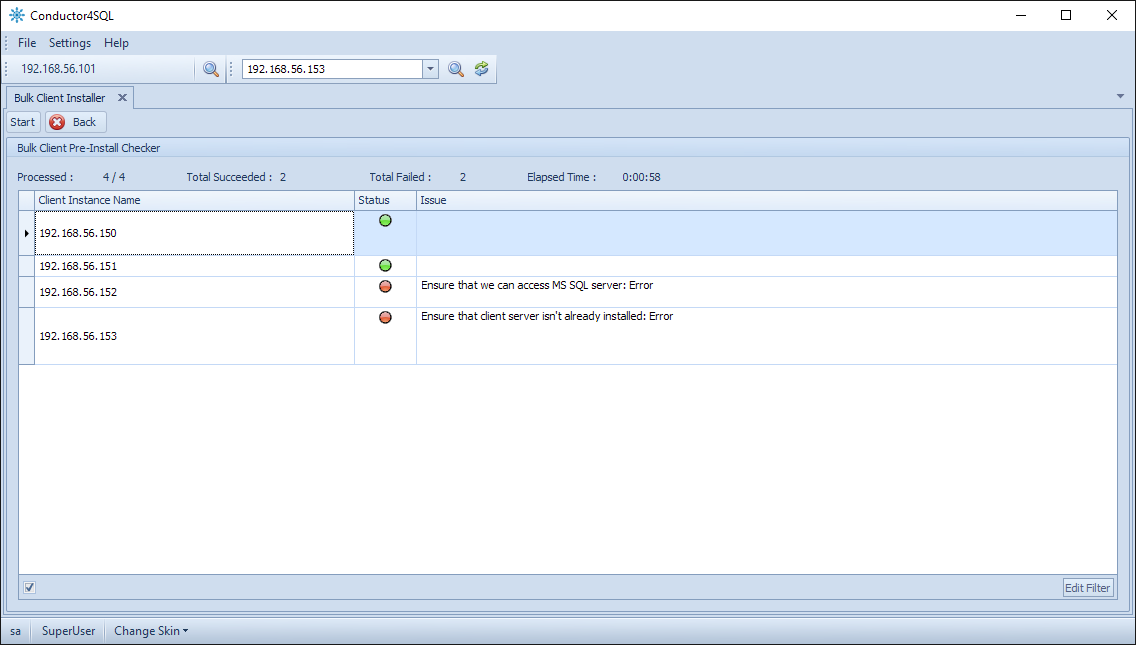
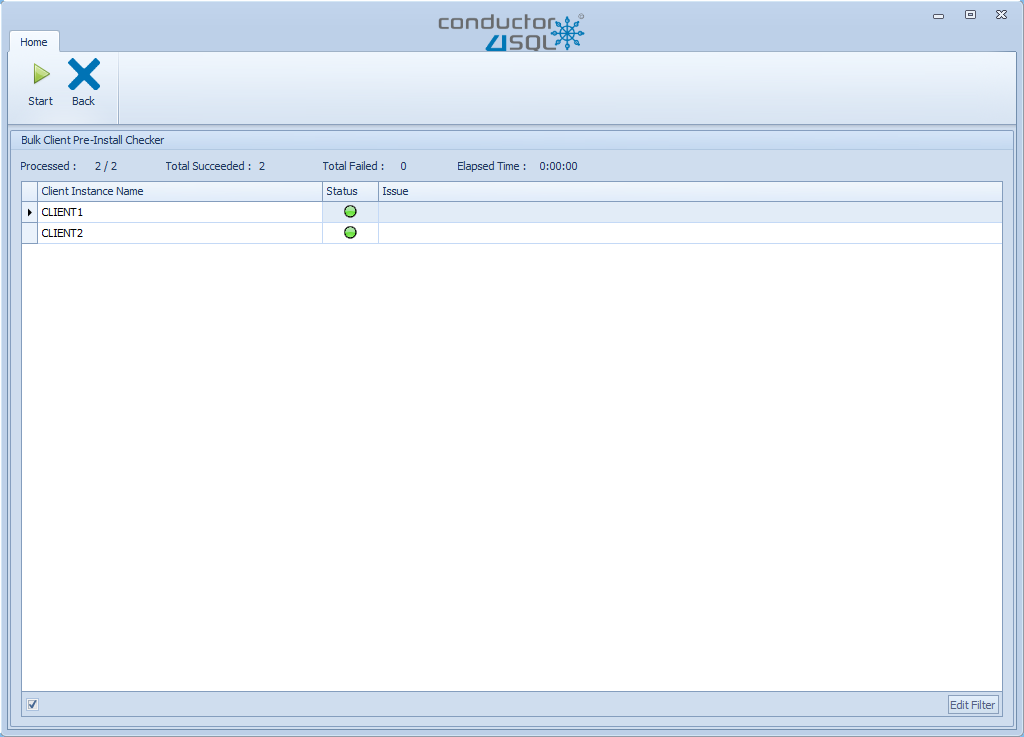
Bulk Pre-Install Checker
Click on the Checker button to run the "Bulk Pre-Install Checker".
Click on the Start button to start the "Bulk Pre-Install Checker"
Note
If you have any errors you can use the same Pre-Checker Issues Diagnostics as the one-at-a-time client installation
Once the pre-checker has been completed. The clients that were successful (green circles) are ready for installation.
To install clients first click on the Back button.
Bulk Client Installer
Now the Installer button will be enabled. Click on the Installer button.
Note
only the clients where the "Bulk Pre-Install Checker" was successful are included in this list.
Now click on the Start button and the clients will start installing and you can follow which step each client is on.
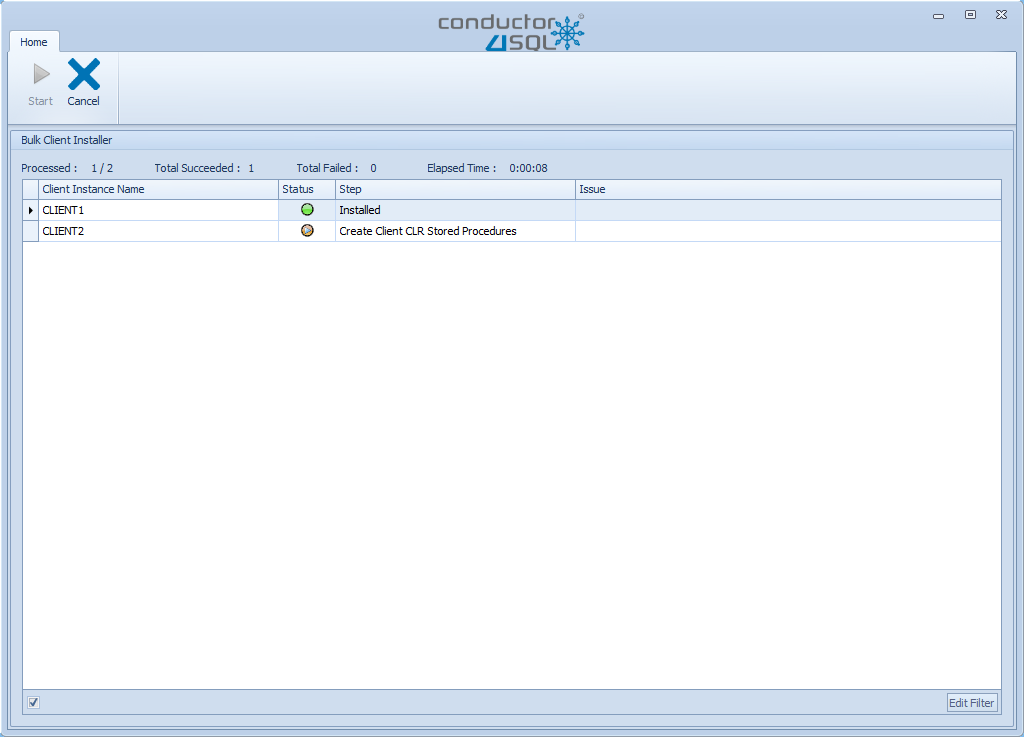
When the installer is complete, click on the Back button and here you can repeat the bulk installation process.
Troubleshooting Test Connections
When trying to install an instance, you must first test the SQL connection. If you receive the error "Test Connection Failed" then try and connect to the instance from SQL Server Management Server from the same server from which the Conductor4SQL central server is running. Typically you'll find that either there is no connectivity from the central server to the client server (firewall issue) or the password was typed in incorrectly.
Troubleshooting Prechecker Issues
How to enable Service Broker
If the Ensure that service broker is enabled for the pre-checker fails, service broker can be enabled in the msdb database using the following SQL script
USE master;
ALTER DATABASE msdb SET ENABLE_BROKER WITH ROLLBACK IMMEDIATE;
Uninstall from client side only
We check if the SyncWorx database and SyncWorxAdmin user is present to prevent trying to install a single instance multiple times via multiple DNS names, e.g. Server1 and Server1.local have two different names but they point to the same server. However, sometimes this is not the case and you've an existing failed client uninstall, e.g. if you've uninstalled an instance from Conductor4SQL taking the "Uninstall client at central side only" because it was offline at the time.
Now that you wish to re-install the instance, you'll need to first take the "Uninstall client at client side only" and select the client instance that you wish to completely uninstall. Once this is complete you should be able to install the instance normally. See more information on Uninstalling Client Instances if needed.
Troubleshooting Installer Issues
Semiphore Timeout
If you see this error "provider: TCP Provider, error: 0 - The semaphore timeout period has expired." the error seems to be related to the connection being established with the remote server but it fails to login remotely within the given time period.
One simple fix that is worth trying is increasing the timeout for remote connection logins on the Client Server to a value that is larger than the default of 10 seconds.
-- Change the remote login timeout to 60 seconds (default is 10)
EXEC sp_configure 'remote login timeout (s)', 60;
RECONFIGURE;
A second less common issue I've seen is that packets aren't getting split up correctly on the network and that network packets that are larger than say 1500 bytes are not able to travel over the network due to the default maximum MTU (maximum transmission unit) for Ethernet or WAN. If that is the case then sometimes changing the "network packet size (B)" in SQL Server can do the trick with getting rid of the semaphore issue. However, it would make the most sense to have a network specialist have a look at the network to see why network packets are not getting split correctly.
-- Change the network packet size to 512 bytes (default is 4096)
EXEC sp_configure 'network packet size (B)', 512;
RECONFIGURE;
Installation failed on "Check For Opening Message"
There are a couple of things that can cause this. Here are the known issues that we are aware of.
Typically you have a network or firewall issue where the central (port 4321) is not open between client instance and central instance. If you get either of these two errors this is usually the reason:
-
The central server did not respond in time. The following error(s) were reported by SQL Server: Connection attempt failed with error: '10060(A connection attempt failed because the connected party did not properly respond after a period of time, or established connection failed because connected host has failed to respond.)'.
-
The central server did not respond in time. The following error(s) were reported by SQL Server: Connection attempt failed with error: '10060(failed to retrieve text for this error. Reason: 15105)'.
Next, a less common issue is the Machine Keys folder, which is a system folder on windows, that is responsible for storing certificate pair keys that Conductor4SQL uses to communicate between client and central instance. We are not 100% sure what changes and breaks this configuration security setting.
If you have a machine keys issue you'll get the following error when Conductor4SQL is checking for the opening message "Machine keys folder either missing or incorrect security settings". The machine keys folder is either in %SystemDrive%\Documents and Settings\All Users\Application Data\Microsoft\Crypto\RSA\MachineKeys or C:\ProgramData\Microsoft\Crypto\RSA\MachineKeys on older windows machines. Please this link for the correct settings for the Machine Keys folder permissions.